Chromebook R11 (CYAN / CB5-132T) - Arch Linux Installation Guide
In this article I explain the steps I took to install Arch Linux on my Chromebook R11 (CYAN / CB5-132T) (I will refer to it as "CB" in rest of the article). I write this article while I go through each step IRL on a CB with factory default settings, therefor anyone should be able to follow this as a guide to get Arch Linux on similar CB of their own.
As a summary, in this guide I will:
Hardware / Firmware changes
- Remove hardware screw inside the CB.
- Put CB into Developer Mode.
- Flash UEFI Full ROM firmware using MrChromebox Firmware Utility Script.
Operating System
- Install Arch Linux (w/o provided installation scripts)
- Configure base system & connect to WIFI on boot.
GUI
- Install & configure i3 window manager. (note: I don't use a display manager)
| Installation Media | archlinux-2019.12.01-x86_64.iso |
| Bootloader | systemd-boot |
| Kernel | Arch Linux default kernel |
| Init | systemd |
| Shell | bash |
| Display/Login Manager | -- none -- |
| Window Manager | i3-wm on Xorg |
| Application Launcher | rofi |
| Terminal | tilda |
For a generic installations instructions see the official Arch Linux Installation Guide.
CB Hardware Configuration
# lspci
00:00.0 Host bridge: Intel Corporation Atom/Celeron/Pentium Processor x5-E8000/J3xxx/N3xxx Series SoC Transaction Register (rev 35)
00:02.0 VGA compatible controller: Intel Corporation Atom/Celeron/Pentium Processor x5-E8000/J3xxx/N3xxx Integrated Graphics Controller (rev 35)
00:0b.0 Signal processing controller: Intel Corporation Atom/Celeron/Pentium Processor x5-E8000/J3xxx/N3xxx Series Power Management Controller (rev 35)
00:10.0 SD Host controller: Intel Corporation Atom/Celeron/Pentium Processor x5-E8000/J3xxx/N3xxx Series MMC Controller (rev 35)
00:12.0 SD Host controller: Intel Corporation Atom/Celeron/Pentium Processor x5-E8000/J3xxx/N3xxx Series SD Controller (rev 35)
00:14.0 USB controller: Intel Corporation Atom/Celeron/Pentium Processor x5-E8000/J3xxx/N3xxx Series USB xHCI Controller (rev 35)
00:1b.0 Audio device: Intel Corporation Atom/Celeron/Pentium Processor x5-E8000/J3xxx/N3xxx Series High Definition Audio Controller (rev 35)
00:1c.0 PCI bridge: Intel Corporation Atom/Celeron/Pentium Processor x5-E8000/J3xxx/N3xxx Series PCI Express Port #1 (rev 35)
00:1c.2 PCI bridge: Intel Corporation Atom/Celeron/Pentium Processor x5-E8000/J3xxx/N3xxx Series PCI Express Port #3 (rev 35)
00:1f.0 ISA bridge: Intel Corporation Atom/Celeron/Pentium Processor x5-E8000/J3xxx/N3xxx Series PCU (rev 35)
02:00.0 Network controller: Intel Corporation Wireless 7265 (rev 59)
# lsusb
Bus 002 Device 001: ID 1d6b:0003 Linux Foundation 3.0 root hub
Bus 001 Device 004: ID 8087:0a2a Intel Corp.
Bus 001 Device 003: ID 0bda:57cf Realtek Semiconductor Corp.
Bus 001 Device 001: ID 1d6b:0002 Linux Foundation 2.0 root hub
A simple hardware modification
CB R11 comes with a hardware write protection on the firmware ROM. And, in order to install UEFI Full ROM that enables us installing regular Linux distribution on the CB; we have to remove this write protection.
In CB R11 this is simple a matter of removing a small screw on the main board. This can easily done using a regular Phillips head screwdriver of matching size.
-
Remove 11 screws on bottom panel.
-
Carefully lift the bottom panel cover. You won't be able to set it aside far because of a glued cable. Just move it as far as possible so there is no tension on the cable.
-
Finally, unscrew & remove the screw indicated in the image below. And, you have a CB with hardware write protection disabled.
 Bottom Panel
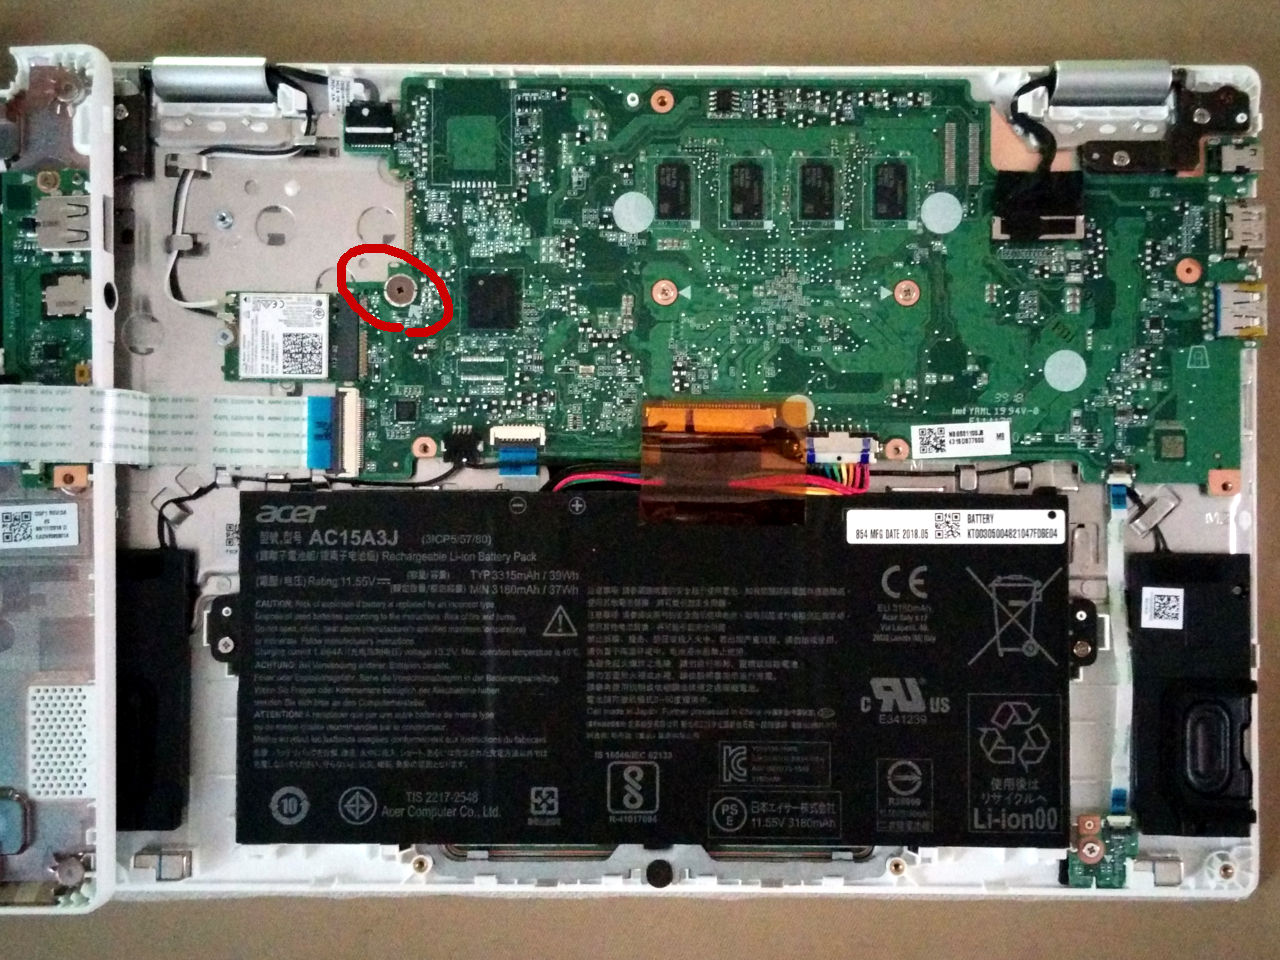 Write Protection Screw
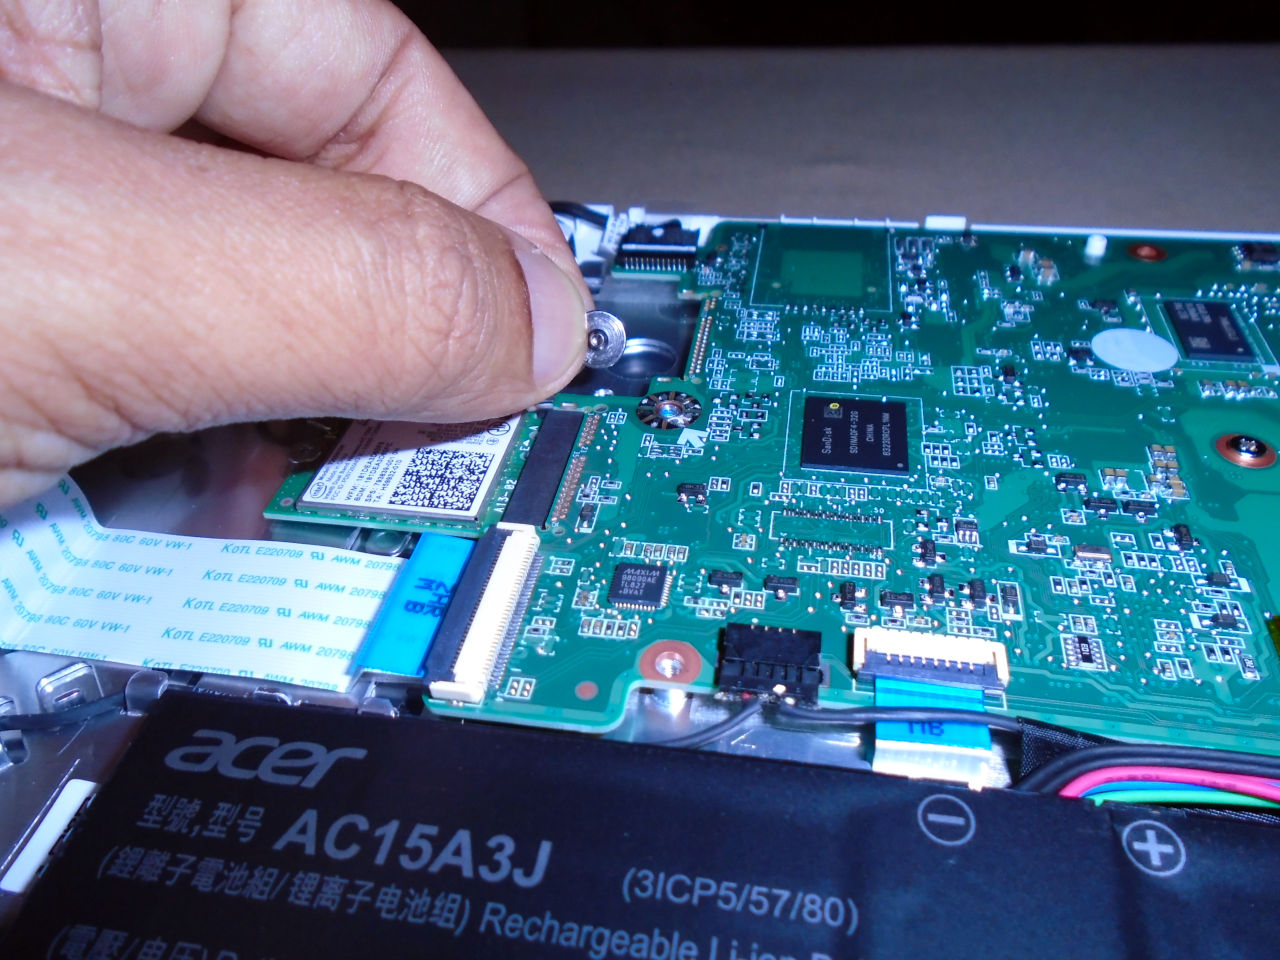 Write Protection Removed
And, now we are ready to flash UEFI firmware using MrChromebox Firmware Utility Script.
Put CB into Developer Mode
Note: it's best to keep your CB connected to power during the following process to make sure it doesn't run out of battery while making modification to the firmware.
To put your CB into developer mode;
-
Make sure it is powered off.
-
Then while holding down the
Esc + Refresh ⟳(NOTE: Refresh key is synonymous to the F3 key on a regular keyboard) on the keyboard, press & release thePowerbutton on the right hand side edge. (You can let go of the keyboard once the white (recovery) screen with red/orange exclamation mark shows up.) -
Now, press
Ctrl + Dto turn on the developer mode, andEnterto confirm.
After the 3rd step above, the device will power down and start the device reset process which wipe out user data. This will take few minutes (remaining time will show up on top left hand corner of the screen).
Once the device reset process is complete, CB will reboot and you will be shown
a white screen with the message "OS verification is OFF". This screen will
remain visible for about 30s (You can skip it by pressing Ctrl + D), and after
couple of beeps, ChromeOS will start as usual. Your CB is now in the Developer
Mode.
To find out more details about CB developer mode, read the Developer Mode Basics on MrChromebox.tech
Virtual Terminal & Root Shell
With developer mode enabled, and you are passed the 30s warning screen, You can
switch to a Linux VT (Virtual Terminal) using Ctrl + Alt + Forward → (F2) key combination.
CB R11 seems to have 4 virtual terminals, on VT1 you will have the ChromeOS booted, and your can use either of VT2..VT4 for the next step.
Each non-GUI VT shows the instruction to login as the default user chronos
with no password.
After you login as chronos user, you can gain root access by running another
shell with sudo command; sudo $SHELL, sudo bash or sudo sh.
Install UEFI Full ROM
In order to boot a regular Linux distribution on the CB, we have to replace the stock firmware that boots ChromeOS with UEFI firmware. MrChromebox.tech provides a script that we can use to get over this step very easily.
Before you can download the script from MrChromebox.tech, you need to connect your CB to the internet via WIFI. It is easier to use the GUI Network tool on ChromeOS (on VT1) to connect to WIFI, and then switch back to terminal VT.
-
Make sure you are logged in as
chronos. -
Make sure you are in a directory that is writable.
/home/chronos/useris a pretty good place, and you can go there by typingcd. -
Download the Firmware Utility Script https://mrchromebox.tech/firmware-util.sh.
-
Run
firmware-util.shas root.
chronos@localhost ~ $ cd
chronos@localhost ~ $ curl -LO https://mrchromebox.tech/firmware-util.sh
chronos@localhost ~ $ sudo $SHELL firmware-util.sh
On the firmware utility menu screen make sure it says "Fw WP: Disabled" or something along that line, and also each menu option you want to use is highlighted with a green [WP] marker.
-
Select the option 3) Install/Update Full ROM Firmware by typing "3" (or the number shown on that line on your menu screen), and press
Enter. -
It will warn you about the consiquences of your action, and ask you to confirm twice by typing
Yand pressing theEnterkey.Then on the 3rd time it will ask you if you want to backup the existing stock ROM. It's a good idea to do that, so insert a USB drive or a memory card with enough space and type
Ykey followed byEnter. Then select the storage device from the list it gives you.Stock ROM backup will be fairly quick. When it finishes, remove the storage device with the stock ROM backup, and press
Enterto flash the new ROM. -
Once the flashing process is done, press
Enteronce to go back to the main menu, typeRand pressEnterto reboot. (This reboot could take few extra seconds)
Now when the CB boot, you will see the "coreboot" (rabit) logo on the screen.
You can press the Esc button while coreboot logo is visible on screen to enter
the system Configuration/Settings program & change the boot order & other
settings.
To find out more details about Firmware Utility Script, read the MrChromebox.tech page.
Preparing Partitions
Assumption: Storage device that we install the OS is connected as mmcblk0.
When setting up a new workstation, I usually wipe out the all partitions in the storage device with the following command.
WARNING: DO NOT do this if you have any data on the storage device that you want to keep. (instead you can manually clear the space new partitions.)
# dd if=/dev/zero of=/dev/mmcblk0 bs=1M count=1
Create the following GPT partitions using fdisk.
| Device Node | Mount Point | Type | Size |
|---|---|---|---|
| /dev/mmcblk0p1 | /boot | EFI | 100MB |
| /dev/mmcblk0p2 | / | Linux | 8GB |
| /dev/mmcblk0p3 | /home | Linux | remainder |
Note: if you get a warning as follows while creating partitions;
Partition #1 contains a vfat signature.

Do you want to reove the signature? [Y]es/[N]o:
Choose to remove the signature by pressing Y followed by the Enter key.
# fdisk /dev/mmcblk0

Welcome to fdisk (util-linux 2.33.1).
Changes will remain in memory only, until you decide to write them.
Be careful before using the write command.

Device does not contain a recognized partition table.
Created a new DOS disklabel with disk identifier 0x640f873c.

Command (m for help): g
Created a new GPT disklabel (GUID: 7724150B-F303-394A-B1FA-78F31BA5169A).

Command (m for help): n
Partition number (1-128, default 1):
First sector (2048-125045390, default 2048):
Last sector, +/-sectors or +/-size{K,M,G,T,P} (2048-125045390, default 125045390): +100M

Created a new partition 1 of type 'Linux filesystem' and of size 100 MiB.

Command (m for help): t
Selected partition 1
Partition type (type L to list all types): 1
Changed type of partition 'Linux filesystem' to 'EFI System'.

Command (m for help): n
Partition number (2-128, default 2):
First sector (1050624-125045390, default 1050624):
Last sector, +/-sectors or +/-size{K,M,G,T,P} (1050624-125045390, default 125045390): +8G

Created a new partition 2 of type 'Linux filesystem' and of size 8 GiB.

Command (m for help): n
Partition number (3-128, default 3):
First sector (22022144-125045390, default 22022144):
Last sector, +/-sectors or +/-size{K,M,G,T,P} (22022144-125045390, default 125045390):

Created a new partition 3 of type 'Linux filesystem' and of size 21 GiB.

Command (m for help): w
The partition table has been altered.
Calling ioctl() to re-read partition table.
Syncing disks.

# fdisk -l /dev/mmcblk0
Disk /dev/mmcblk0: 59.6 GiB, 64023257088 bytes, 125045424 sectors
Disk model: TS64GSSD320
Units: sectors of 1 * 512 = 512 bytes
Sector size (logical/physical): 512 bytes / 512 bytes
I/O size (minimum/optimal): 512 bytes / 512 bytes
Disklabel type: gpt
Disk identifier: 7724150B-F303-394A-B1FA-78F31BA5169A

Device        Start       End   Sectors  Size Type
/dev/mmcblk0p1      2048   1050623   1048576  512M EFI System
/dev/mmcblk0p2   1050624  22022143  20971520   10G Linux filesystem
/dev/mmcblk0p3  22022144 125045390 103023247 49.1G Linux filesystem
Format each partition as follows:
# mkfs.vfat -F32 /dev/mmcblk0p1
--- output not shown here ---
# mkfs.ext4 /dev/mmcblk0p2
--- output not shown here ---
# mkfs.ext4 /dev/mmcblk0p3
--- output not shown here ---
NOTE: I'm not creating a swap partition here, because I don't use swap on my workstations. However, I will be including the instruction to create swap file in a later stage.
Prepare for base system installation
File System
Mount the partition which eventually be the root of the system (/dev/mmcblk0p2) to
/mnt, and create sub-directories.
# mount /dev/mmcblk0p2 /mnt
# mkdir -m 0755 -pv \
> /mnt/{boot,dev,etc/systemd/network,home,run,var/{cache/pacman/pkg,lib/pacman,log}}
mkdir: created directory '/mnt/boot'
mkdir: created directory '/mnt/dev'
mkdir: created directory '/mnt/etc'
mkdir: created directory '/mnt/etc/systemd'
mkdir: created directory '/mnt/etc/systemd/network'
mkdir: created directory '/mnt/home'
mkdir: created directory '/mnt/run'
mkdir: created directory '/mnt/var'
mkdir: created directory '/mnt/var/cache'
mkdir: created directory '/mnt/var/cache/pacman'
mkdir: created directory '/mnt/var/cache/pacman/pkg'
mkdir: created directory '/mnt/var/lib'
mkdir: created directory '/mnt/var/lib/pacman'
mkdir: created directory '/mnt/var/log'
# mkdir -m 0750 -pv /mnt/var/lib/iwd
mkdir: created directory '/mnt/var/lib/iwd'
# mkdir -m 0555 -pv /mnt/{proc,sys}
mkdir: created directory '/mnt/proc'
mkdir: created directory '/mnt/sys'
# mkdir -m 1777 -pv /mnt/tmp
mkdir: created directory '/mnt/tmp'
Mount remaining partitions.
# mount /dev/mmcblk0p1 /mnt/boot
# mount /dev/mmcblk0p3 /mnt/home
Swapfile (optional)
# dd if=/dev/zero of=/mnt/swap bs=512M count=1
--- output not shown here ---
# chmod 600 /mnt/swap
# mkswap /mnt/swap
--- output not shown here ---
# swapon /mnt/swap
Connect installation environment to LAN/Internet
Assumption: Your system connects to LAN/Internet using the interface wlp1s0.
Enable WIFI connection using iwd. When using a wired connection this steps
in this section may be skipped partly or completely.
Connect to WIFI (optional)
# systemctl start iwd
# iwctl device wlp1s0 set-property Powered on
# iwctl
[iwd]# station wlp1s0 connect ESSID
Type the network passphrase for ESSID psk.
Passphrase: secret
[iwd]# exit
# sed '/^Passphrase=/d' /var/lib/iwd/ESSID.psk > /mnt/var/lib/iwd/ESSID.psk
# chmod 0600 /mnt/var/lib/iwd/ESSID.psk
Then, create a network configuration file (in the target FS), and sym-link it to the installation system.
# cat > /mnt/etc/systemd/network/any-network-name.network << EOF
[Match]
Name=wlp1s0

[Network]
DHCP=yes
EOF
# ln -sv /mnt/etc/systemd/network/any-network-name.network /etc/systemd/network
'/etc/systemd/network/any-network-name.network' -> '/mnt/etc/systemd/network/any-network-name.network'
Start systemd-networkd and systemd-resolved services.
# systemctl start systemd-networkd
# systemctl start systemd-resolved
Note: You might have to symlink /run/systemd/resolve/stub-resolv.conf to
/etc/resolv.conf
Install base system
[NOTE TO SELF] Use local pacman cache
Mount cache server into /var/cache/pacman/pkg of the installation environment.
# mkdir -pv /var/lib/pacman/sync
mkdir: created directory '/var/lib/pacman/sync'
# mount -o nolock SERVER_IP:/path/to/sync /var/lib/pacman/sync
# mount -o nolock SERVER_IP:/path/to/cache /var/cache/pacman/pkg
[/NOTE TO SELF]
Mount pseudo file systems to the target
# mount -t devtmpfs udev /mnt/dev
# mount -t proc proc /mnt/proc
# mount -t sysfs sys /mnt/sys
# mount -t tmpfs tmp /mnt/tmp
For the installation you can use mirror closest to you and later do a
full system upgrade using an up-to-date repository. Select the closest
mirror and move it to the top of /etc/pacman.d/mirrorlist.
Note: install all the packages from base-devel group.
# pacman -Sy -r /mnt linux linux-firmware intel-ucode iwd dhcpcd nfs-utils base-devel
--- output not shown here ---
Make the new installation bootable
Bootloader configuration
Make UEFI boot directories for systemd-boot (without using bootctl), copy
boot loader firmware and create loader configuration files manually.
# mkdir -pv /mnt/boot/{EFI/systemd,loader/entries}
mkdir: created directory '/mnt/boot/EFI'
mkdir: created directory '/mnt/boot/EFI/systemd'
mkdir: created directory '/mnt/boot/loader'
mkdir: created directory '/mnt/boot/loader/entries'
# cp /mnt/lib/systemd/boot/efi/systemd-bootx64.efi /mnt/boot/EFI/systemd
# cat > /mnt/boot/loader/loader.conf << EOF
> default loader-name
> timeout 0
> EOF
# cat > /mnt/boot/loader/entries/loader-name.conf << EOF
> title Arch Linux
> linux /vmlinuz-linux
> initrd /intel-ucode.img
> initrd /initramfs-linux.img
> options root=/dev/mmcblk0p2 init=/usr/lib/systemd/systemd rw quiet
> EOF
If there are any dump-* files in the /sys/firmware/efi/efivars directory,
delete them all, and then run;
# efibootmgr --create --disk /dev/mmcblk0 --part 1 --loader /EFI/systemd/systemd-bootx64.efi --label "Arch Linux"
Setup system via chroot
# chroot /mnt /bin/bash
Connect the system to network on boot
# systemctl enable iwd systemd-networkd systemd-resolved
--- output not shown here ---
# ln -sfv /run/systemd/resolve/stub-resolv.conf /etc/resolv.conf
'/etc/resolv.conf' -> '/run/systemd/resolve/stub-resolv.conf'
Initialize pacman keys
# pacman-key --init
--- output not shown here ---
# pacman-key --populate archlinux
--- output not shown here ---
# sed -i 's/^#\(Server =.\+\)$/\1/' /etc/pacman.d/mirrorlist
Although it might not be necessary for a new installation, do a system update.
# pacman -Syu
--- output not shown here ---
Create /etc/fstab
# cat >> /etc/fstab << EOF
>
> /dev/mmcblk0p2 / ext4 rw,relatime,noatime,nodiratime,discard,errors=remount-ro 0 1
> /dev/mmcblk0p1 /boot vfat rw,relatime,fmask=0022,dmask=0022,shortname=mixed,errors=remount-ro 0 2
> /dev/mmcblk0p3 /home ext4 rw,relatime,noatime,nodiratime,discard,errors=remount-ro 0 2
> EOF
[NOTE TO SELF] Mount local pacman cache when required
# cat >> /etc/fstab << EOF
>
> SERVER_IP:/path/to/sync /var/lib/pacman/sync nfs noauto,x-systemd.automount,noexec,nolock,noatime,nodiratime,rsize=32768,wsize=32768,timeo=14,nfsvers=3 0 0
> SERVER_IP:/path/to/cache /var/cache/pacman/pkg nfs noauto,x-systemd.automount,noexec,nolock,noatime,nodiratime,rsize=32768,wsize=32768,timeo=14,nfsvers=3 0 0
> EOF
[/NOTE TO SELF]
Set /etc/hostname
# echo 'machine-name' > /etc/hostname
Time zone and clock settings
Setting time zone to Asia/Colombo. Make sure you change the Asia/Colombo text
& the zoneinfo directory to match your time zone.
# echo 'Asia/Colombo' > /etc/timezone
# rm /etc/localtime
# ln -sv /usr/share/zoneinfo/Asia/Colombo /etc/localtime
'/etc/localtime' -> '/usr/share/zoneinfo/Asia/Colombo'
# hwclock --hctosys --utc
# date
Sun Mar  3 01:59:02 +0530 2019
[NOTE TO SELF] Enable synchronization with local NTP server
Set systemd-timesyncd to synchronize system time via NTP.
# sed -i 's/^#\(NTP=\)/\1NTP_SERTVER_IP/; s/^#\(FallbackNTP=.\+\)/\1/' /etc/systemd/timesyncd.conf
# systemctl enable systemd-timesyncd
[/NOTE TO SELF]
Optionally, if the system time need to be changed:
# date MMDDhhmmYYYY
# hwclock --systohc --utc
# date
DDD MMM DD hh:mm:?? +0530 YYYY
Generate locale
# cat >> /etc/locale.gen << EOF
> en_US.UTF-8 UTF-8
> si_LK.UTF-8 UTF-8
> EOF
# locale-gen
Generating locales...
  en_US.UTF-8 UTF-8... done
  si_LK.UTF-8 UTF-8... done
Generation complete.
Note: at this point systemd will not allow us to set locale using localectl.
We will do that after booting into the new system.
systemd adjustments
Stop console clearing at login prompt
# mkdir -pv /etc/systemd/system/getty@tty1.service.d
mkdir: created directory '/etc/systemd/system/getty@tty1.service.d'
# cat > /etc/systemd/system/getty@tty1.service.d/noclear.conf << EOF
> [Service]
> TTYVTDisallocate=no
> EOF
Limit number of TTYs
# sed -i 's/#\(NAutoVTs=\).*/\12/' /etc/systemd/logind.conf
Limit journal disk usage
# sed -i 's/#\(SystemMaxUse=\).*/\116M/' /etc/systemd/journald.conf
Mask unnecessary systemd units that cause delay in system startup
# systemctl mask lvm2-monitor systemd-backlight@
pacman configurations
[NOTE TO SELF] Block pacman from installing mono and/or java runtime.
# sed -i 's/#\(IgnorePkg\s*=.*\)/\1 mono mono-* *-openjdk-headless/' /etc/pacman.conf
[/NOTE TO SELF]
Enable color in pacman output
# sed -i 's/#\(Color\|VerbosePkgLists\)/\1/' /etc/pacman.conf
Disable webcam
# cat >> /etc/modprobe.d/modprobe.conf << EOF
> blacklist uvcvideo
> EOF
Create user(s)
# useradd -m -s /bin/bash -G systemd-journal,wheel -U new_username
# passwd new_username
Enter new UNIX password:
Retype new UNIX password:
passwd: password updated successfully
sudo capability
Add this user to /etc/sudoers as we will be blocking root from login in the
system.
# cat >> /etc/sudoers << EOF
> new_username machine_name=(root) /usr/bin/pacman
> EOF
You may allow regular user to gain access to a root shell via sudo during the
setup in order to prevent any lock-up situation;
# cat >> /etc/sudoers << EOF
> new_username machine_name=(root) /usr/bin/su -ls /usr/bin/bash
> EOF
WARNING: however above may leave your system insecure in some situations and you may remove this capability once it is no longer needed.
Lockout root from login into console or from SSH in. Optionally remove
the password hash for root from /etc/shadow.
# rm /etc/securetty
# sed -i 's#\(root:x:0:0::/root:/bin/\).\+#\1false#' /etc/passwd
# sed -i 's/\(root:\)[^:]*\(:.\+\)/\1!!\2/' /etc/shadow
Disable shell history at system level
Note: users may enable/override this from their shell configuration.
# cat >> /etc/profile << EOF
>
> # Disable shell history recording for all users
> unset HISTFILE
> export HISTFILESIZE=0
> EOF
At this point you should reboot into newly installed system, and login as a regular user.
Exit chroot, unmount and reboot
# exit
exit
# umount -Rv /mnt
unmount: /mnt/boot unmounted
unmount: /mnt/home unmounted
unmount: /mnt/dev unmounted
unmount: /mnt/proc unmounted
unmount: /mnt/sys unmounted
unmount: /mnt/tmp unmounted
unmount: /mnt unmounted
# systemctl reboot
First-boot configuration
Set locale
# localectl set-locale LANG=en_US.UTF-8
pacman mirror list
Setup reflector to update pacman mirror list every time system boots.
# pacman -S reflector
--- output not shown here ---
# cat > /etc/systemd/system/reflector.service << EOF
> [Unit]
> Description=Pacman mirrorlist update
> Wants=network-online.target
> After=network-online.target
>
> [Service]
> Type=oneshot
> ExecStart=/usr/bin/reflector --protocol https --latest 30 --number 20 --fastest 10 --sort rate --save /etc/pacman.d/mirrorlist
> EOF
# cat > /etc/systemd/system/reflector.timer << EOF
> [Unit]
> Description=Pacman mirrorlist update runner
>
> [Timer]
> OnCalendar=daily
> RandomizedDelaySec=1day
> Persistent=true
>
> [Install]
> RequiredBy=timers.target
> EOF
# systemctl enable reflector.timer
Install yay AUR helper
$ sudo pacman -S git
--- output not shown here ---
$ git clone https://aur.archlinux.org/yay /tmp/yay
--- output not shown here ---
$ cd /tmp/yay
$ makepkg -si
--- output not shown here ---
$ sudo pacman -Rcnsu go
--- output not shown here ---
Use yay to reinstall yay, so that all AUR packages in out system is
properly installed using yay.
$ yay --removemake -S yay
--- output not shown here ---
Optionally, do a full system update using yay.
$ yay --removemake --combinedupgrade -Syu
--- output not shown here ---
GUI
Xorg
Install appropriate video driver.
$ sudo pacman -S xf86-video-vendor
--- output not shown here ---
$ sudo pacman -S xorg-{server,xinit}
--- output not shown here ---
Configure Xorg to start on user login.
$ cat >> ~/.bash_profile << EOF
>
> if [[ ! $DISPLAY && $XDG_VTNR -eq 1 ]]; then
>   exec startx
> fi
> EOF
Fonts
$ sudo pacman -S ttf-{dejavu,droid}
--- output not shown here ---
i3 Window Manager
Install i3 window manager, and set Alt key as $mod.
$ sudo pacman -S i3-wm
--- output not shown here ---
$ cat > ~/.xinitrc << EOF
> exec i3 > /dev/null 2>&1
> EOF
$ mkdir -pv ~/.config/i3
mkdir: created directory '/home/suda/.config/i3'
$ cat > ~/.config/i3/config << EOF
> set $mod Mod1
> EOF
rofi launcher
$ sudo pacman -S rofi
--- output not shown here ---
$ cat >> ~/.config/i3/config << EOF
>
> bindsym $mod+d exec --no-startup-id rofi -show run
> EOF
Terminal
Install tilda terminal emulator & launch it when i3 starts.
$ sudo pacman -S tilda
--- output not shown here ---
$ cat >> ~/.config/i3/config << EOF
>
> exec --no-startup-id tilda
> EOF
Following instructions are for my personal setup choices.
Bash completion
$ sudo pacman -S bash-completion
--- output not shown here ---
Man pages & viewer
$ sudo pacman -S man-db
--- output not shown here ---
playerctl
Install playerctl to control volume via keyboard.
$ sudo pacman -S playerctl
--- output not shown here ---
iBus
$ sudo pacman -S ibus
--- output not shown here ---
$ cat >> ~/.bashrc << EOF
>
> export GTK_IM_MODULE=ibus
> export XMODIFIERS=@im=ibus
> export QT_IM_MODULE=ibus
> export XIM_PROGRAM=/usr/bin/ibus-daemon
> EOF
Xorg extra
$ sudo pacman -S xorg-{xbacklight,xrandr,xset}
--- output not shown here ---
Extra Fonts
$ yay -S ttf-lklug otf-fira-{code,mono,sans} otf-font-awesome noto-fonts{,-emoji}
--- output not shown here ---
Programming languages and Development Tools
Node.js & pnpm
First install pnpm into temporary directory, and then use that installation
as a bootstrap to install pnpm under $HOME. See pnpm documentation for details.
$ sudo pacman -S nodejs
--- output not shown here ---
$ curl -L https://raw.githubusercontent.com/pnpm/self-installer/master/install.js | \
> PNPM_DEST=/tmp PNPM_BIN_DEST=/tmp/bin node
--- output not shown here ---
$ /tmp/bin/pnpm -g install pnpm
Rust
Install rust via rustup.
$ sudo pacman -S rustup
--- output not shown here ---
$ rustup default stable
--- output not shown here ---
$ rustup update
--- output not shown here ---
PHP & Composer
$ sudo pacman -S composer
--- output not shown here ---
GUI Applications & Tools
$ sudo pacman -S evince filezilla gnome-calculator keepassxc meld thunar file-roller \
> dunst
--- output not shown here ---
Firefox nightly
$ mkdir -pv $HOME/opt
mkdir: created directory '/home/username/opt'
$ curl -sL "https://download.mozilla.org/?product=firefox-nightly-latest-ssl&os=linux64&lang=en-US" | \
> tar xj -C $HOME/opt
$ sudo pacman -S dbus-glib
--- output not shown here ---
Syncthing
$ sudo pacman -S syncthing
--- output not shown here ---
$ mkdir -pv $HOME/Sync
mkdir: created directory '/home/username/Sync'
GTK & Icon themes
$ sudo pacman -S arc-gtk-theme papirus-icon-theme
--- output not shown here ---
Vim
$ sudo pacman -S gvim
--- output not shown here ---
And, also install spell checking tools.
$ sudo pacman -S aspell-en hunspell-en_US ispell
--- output not shown here ---
$ mkdir -pv $HOME/.vim/spell
mkdir: created directory '/home/username/.vim'
mkdir: created directory '/home/username/.vim/spell'
$ ln -sv $HOME/.aspell.en.pws $HOME/.vim/spell/en.utf-8.add
'/home/username/.vim/spell/en.utf-8.add' -> '/home/username/.aspell.en.pws'
conky
$ sudo pacman -S conky
Other Tools
$ sudo pacman -S iproute2 iputils openssh tree veracrypt
Telegram
$ curl -sL https://telegram.org/dl/desktop/linux | tar xJ -C $HOME/opt Telegram/Telegram